Chapter 6 —
The Video Odyssey Screen Saver
This chapter introduces the Video Odyssey Screen Saver and gives a brief overview of the application and basic concepts. The chapter also includes information on:
- Launching Video Odyssey
- About Video Odyssey Files
- Using Video Odyssey Options
Video Odyssey: Overview and Concepts
This section briefly describes the Video Odyssey Screen Saver. Topics include:
- What is Video Odyssey?
- About Video Odyssey Files
Video Odyssey is a screen saver that plays video clips on your screen. The Video Odyssey program runs in the background and monitors mouse movement and keyboard activity. When a preset time has elapsed with no mouse or keyboard activity, Video Odyssey takes over the screen and continuously plays a compressed video file until you either move the mouse or press a key.
Video Odyssey is compute intensive. Video playback rate is highly dependent upon system speed, the number of background processes, and speed of the frame buffer. Video Odyssey is meant for workstations with single users.
Video Odyssey accepts JPEG format AVI files. These files are typically given the extension .avi. Other file extensions used with JPEG compression are .mjpg and .jpg.
Some AVI files do not use JPEG compression. Indeo and Microsoft Video 1 are two alternate compression schemes in use today. Video Odyssey is compatible only with JPEG compression because the screen saver uses a Motion-JPEG software decompressor. If Video Odyssey returns the error "Not a JPEG file", it means that one of these alternate compression schemes has been used.
You can use the AlphaVCR application to make your own video files for playback with Video Odyssey, or play the sample AVI files in the sample data subset (MMERTSMPLDAT240) provided with Multimedia Services.
Video Odyssey: Graphical User Interface
This section shows and explains the visual components that make up the Video Odyssey screen saver and describes the control panel options. Topic include:
- Launching Video Odyssey
- The Video Odyssey Control Panel
Video Odyssey can be launched from the UNIX command line, from the Session Manager, or from the CDE Multimedia Program Group. The following step-by-step procedure describes the different ways of launching Video Odyssey:
Step-By-Step
| Launching Video Odyssey From the UNIX Command Line | ||
| Task/Location | Action | Result |
| UNIX command line |
|
The Video Odyssey Control Panel is displayed. |
| Launching Video Odyssey From the CDE Program Group | ||
| Task/Location | Action | Result |
| CDE program group. MMS program group |
|
The MMS icons are displayed. |
|
Video Odyssey launches. | |
The Video Odyssey Control Panel
When Video Odyssey is invoked, a control panel is displayed on your screen. This control panel lets you change the way the application operates. Each time a control is changed, the new settings are saved in the .videoodyssey.cnf file in your home directory.
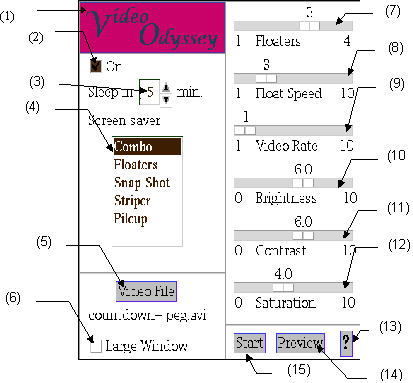
The Video Odyssey screen saver is controlled through a single control panel that is displayed when you launch the application. Use the controls in this panel to set up screen-saver behavior. See Figure 6-1 for an example of the Video Odyssey Control Panel.
Legend Description (1) Logo Button: Displays copyright and version information (2) On/Off Button: Click to enable screensaver (3) Sleep In Period: Sets wait time from mouse going still to saver activation (4) Screen Saver Effects: Selects different effects (5) Video File Button: Lets you choose video file (6) Large Window Button: Doubles size of video window; when you choose large window you can have only one floater window (7) Floaters Slider: Sets number of floating windows (8) Floater Speed Slider: Sets speed of floating windows (9) Video Rate Slider: Sets video playback rate (10) Brightness Slider: Adjusts video brightness (11) Contrast: Adjusts video contrast (12) Saturation Slider: Adjusts video color saturation (13) (?) Button: Displays the help window (14) Preview/Stop Button: Allows video viewing while adjusting the settings. After you click the Preview Button, it changes to Stop. When you finish adjusting the settings, click on the Stop Button. (15) Start Button: Starts screen saver without waiting for sleep time to elapse
This section contains step-by-step instructions on how to use Video Odyssey. Topics include:
- Enabling and Disabling Video Odyssey
- Selecting a Screen Saver Effect from Video Odyssey
- Selecting a Video File for Video Odyssey
- Video Odyssey Defaults
Enabling and Disabling Video Odyssey
The screen saver is active whenever the control panel On button is lit. Also, the screen saver control panel does not have to be on screen in order for the screen saver to be active. The following step-by-step procedure describes how to enable and disable Video Odyssey:
Step-By-Step
| Disabling Video Odyssey | ||
| Task/Location | Action | Result |
| Video Odyssey Control Panel |
|
The Button becomes empty and Video Odyssey is disabled. |
|
||
The Sleep In box controls the sleep time for the screen saver. Sleep time is the length of time the mouse and keyboard have been inactive. Once this time has been reached, the screen saver is activated.
Video Odyssey uses two hot spots. These hot spots will immediately start the screen saver or disable the screen saver.
The following step-by-step procedures describes how to control sleep time and hot spots in Video Odyssey:
Step-By-Step
| Controlling Sleep Time | ||
| Task/Location | Action | Result |
| Video Odyssey Control Panel |
|
Video Odyssey adjusts to the sleeping time specified. |
| Using Sleep Hot Spots | ||
| Task/Location | Action | Result |
| Display |
|
The screen saver starts immediately without waiting for the sleep time to elapse. |
|
The screen saver will be disabled. | |
Selecting a Screen Saver Effect From Video Odyssey
Video Odyssey lets you choose from a list of screen saver effects. Table 6-1 lists and describes these effects.
| Effect | Result |
| Combo | cycles through all the Video Odyssey effects. |
| Floaters | lets you choose from one to four floating windows and their floating speeds. These windows constantly move and bounce off the sides of the screen. |
| Snapshot | causes one floating window to appear and randomly places a frame on the screen as the window continues to float. Eventually, the entire screen is filled with different frames from the video clip. |
| Striper | places tiles on the screen in a left-to-right and top-to- bottom sequence, filling up the screen in the process. |
| Pileup | plays a video clip from a window centered on the screen while randomly placing frames on the screen underneath this centered window. Eventually, the entire screen is filled in the process. |
The following step-by-step procedure describes how to select one of the Video Odyssey Screen Saver effects:
Step-By-Step
| Selecting Screen Saver Effects | ||
| Task/Location | Action | Result |
| Video Odyssey Control Panel |
|
Video Odyssey uses the selected effect. |
Selecting a Video File for Video Odyssey
Video Odyssey lets you select a video file. The following procedure describes how to select a video file to use with Video Odyssey:
Step-By-Step
| Selecting and Using a Video File | ||
| Task/Location | Action | Result |
| Video Odyssey Control Panel |
|
Video Odyssey displays an Open File Dialog Box. |
|
Video Odyssey uses the selected video file. | |
Every time you change a setting in the control panel, Video Odyssey saves a copy of the settings (sleep time, on/off state, brightness, contrast, and so forth). The settings are stored in a file in your home directory with the name .videoodyssey.cnf. If this file is removed, or if the application cannot create the file, it will use its own default values for the settings and any changes you make will not be saved.
Video Odyssey saves new settings in the file in your home directory whenever you change them. It uses this configuration file to initialize the application settings when Video Odyssey starts.
Video Odyssey Command Line Syntax
This section describes the Video Odyssey command line syntax.
Video Odyssey Command Line Syntax
The syntax for Video Odyssey is:
videoodyssey [-bg ColorName][-f VideoFile][-fg ColorName ]
[-geometry +X_offset +Y_offset][-iconic ]
where:
[-bg ColorName]
Specifies the background color for the Video Odyssey control panel. Valid names are red, black, steel blue, and so forth. Color names may be substituted with color values.
[-f VideoFile]
Specifies the JPEG-compressed video file to be played back. The file must be in Microsoft's AVI format.
[-fg ColorName ]
Specifies the foreground color for the Video Odyssey control panel. Valid names are red, black, blue, and so forth.
[-geometry +X_offset +Y_offset]
Positions the upper left corner of the control panel's window at the specified value relative to the upper left corner of the screen.
[-iconic ]
Brings up Video Odyssey as an icon.